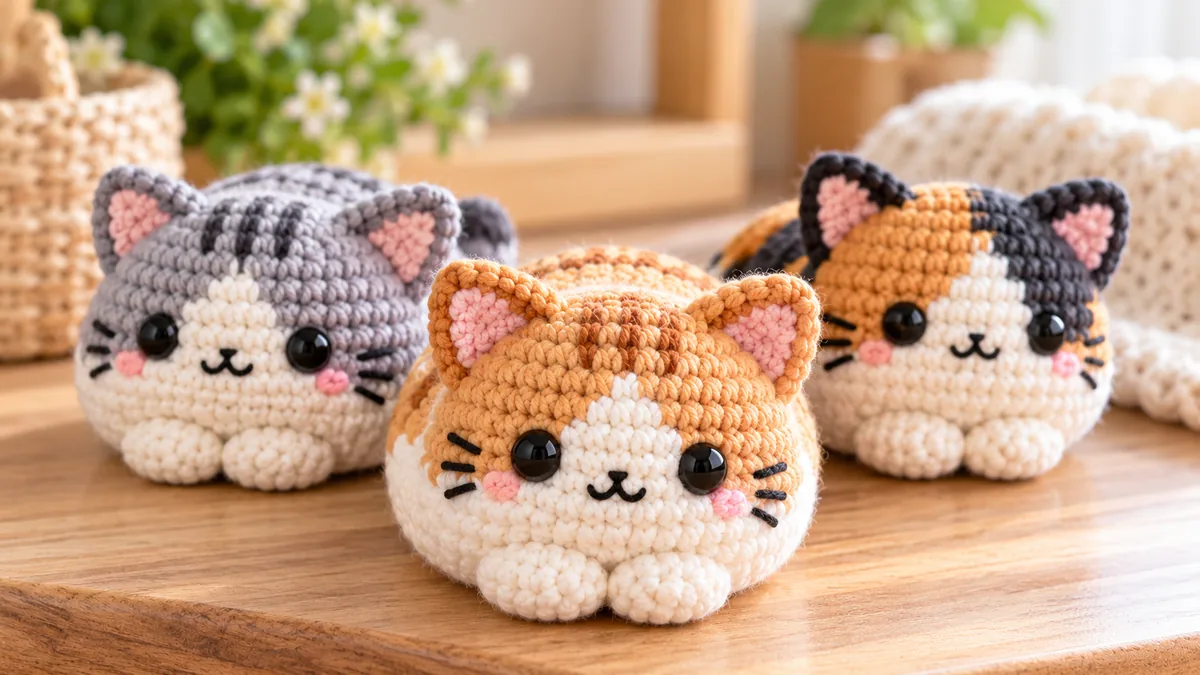
This no sew cat crochet pattern makes a compact loaf-style amigurumi cat with a rounded one-piece body, built-in front paws, surface-crochet ears, a short integrated tail, and an embroidered face. There are no separate legs, ears, or tail pieces to pin and sew onto the body. The construction is designed for beginners who know the basic amigurumi stitches and want a quick project with minimal finishing.
The loaf shape is especially practical for no-sew crochet because the cat’s body can stay low and rounded while the paws and tail are formed directly from body stitches. This pattern uses US crochet terms. If you want more minimal-assembly projects, browse our No Sew Amigurumi Patterns collection. You can also try the No Sew Frog Crochet Pattern or the No Sew Dinosaur Crochet Pattern.
No Sew Cat Crochet Pattern: Quick Reference
| Detail | Information |
|---|---|
| Skill level | Beginner to advanced beginner |
| Terminology | US crochet terms |
| Construction | One continuous loaf body with integrated paws and tail |
| Sewing | No assembly sewing |
| Yarn | Worsted weight cotton or acrylic |
| Hook | 3.5 mm starting point |
| Finished length | About 10 to 12 cm with worsted yarn |
| Worked | Continuous rounds from face to back |
Materials
- Worsted weight yarn in cream, gray, orange, black, or your preferred cat color
- Small amount of contrasting yarn for stripes or patches
- Small amount of pink yarn for the nose and optional inner-ear detail
- Black embroidery thread for mouth and whiskers
- 3.5 mm crochet hook
- Polyester fiberfill
- Two 8 to 10 mm safety eyes, or black yarn for embroidered eyes
- Stitch marker
- Yarn needle for hiding ends and embroidery only
- Scissors
For a first attempt, use smooth cotton or acrylic yarn. Smooth yarn makes it much easier to identify the stitches used for the paws, ears, and tail. Chenille can make an adorable plush cat, but the loops are harder to see and mistakes are more difficult to unravel.
Crochet Abbreviations
| Abbreviation | Meaning |
|---|---|
| MR | Magic ring |
| ch | Chain |
| sc | Single crochet |
| inc | Increase, 2 sc in one stitch |
| dec | Invisible decrease |
| sl st | Slip stitch |
| hdc | Half double crochet |
| dc | Double crochet |
| st / sts | Stitch / stitches |
How This No Sew Loaf Cat Is Constructed
The cat starts at the face and grows toward the back. Increase rounds create the rounded head, then straight rounds extend the body. Two small bobble-style front paws are worked directly into a body round. The ears are added later with surface crochet through existing stitches rather than as separate pieces. At the back, the body narrows and a short tail is made from the final edge before the opening is closed.
This construction removes the part many beginners find frustrating: sewing several tiny pieces in symmetrical positions. The important checkpoints are the stitch count, eye placement, paw spacing, and keeping the back lightly stuffed so the tail can sit naturally.
Pattern Notes Before You Start
- Work in continuous spiral rounds unless the instructions say otherwise.
- Move the stitch marker to the first stitch of each new round.
- Count at the end of every increase and decrease round.
- The front paws are worked into the body, not made separately.
- Do not overstuff the final back rounds.
- Surface-crochet ears are added after the body is closed.
- For young children, embroidered eyes are preferable to detachable plastic eyes.
Step 1: Crochet the Rounded Face
Start with your main cat color. The first five rounds form the front dome.
| Round | Instructions | Stitches |
|---|---|---|
| 1 | 6 sc in MR | 6 |
| 2 | inc in each st around | 12 |
| 3 | [sc, inc] x 6 | 18 |
| 4 | [2 sc, inc] x 6 | 24 |
| 5 | [3 sc, inc] x 6 | 30 |
After Round 5, the piece should form a shallow cup rather than a flat circle. If it ripples, recount the stitches before continuing. An accidental extra increase is easier to correct now than after the eyes are installed.
Step 2: Extend the Head and Place the Eyes
| Round | Instructions | Stitches |
|---|---|---|
| 6 | sc around | 30 |
| 7 | sc around | 30 |
| 8 | sc around | 30 |
Place the eyes between Rounds 6 and 7, about 6 stitches apart. Insert the posts first without locking the washers. Look directly at the face and check that both eyes are level. Small changes of one stitch can make a noticeable difference on a compact amigurumi face.
If you want a sleepy cat, skip the safety eyes and embroider two short curved eyelids after stuffing. This is also the better option for a cat intended for babies or very young children.
Step 3: Make the Integrated Front Paws
Round 9 creates the two small front paws without separate pieces. A bobble is made from several partially completed double crochets worked into one body stitch.
Bobble: yarn over, insert hook into the stitch, yarn over and pull up a loop, yarn over and pull through two loops. Repeat this partial double crochet four more times in the same stitch. Yarn over and pull through all loops on the hook. The bobble should pop toward the outside of the body.
Round 9: 6 sc, bobble in next st, 4 sc, bobble in next st, 18 sc. (30 body positions)
Push both bobbles outward with your finger before continuing. They should sit on the lower front of the cat. If one paw pops inward, turn it outward now while the body is still open.
Step 4: Crochet the Loaf Body
The next rounds create the long, low body that gives the project its loaf-cat silhouette.
| Round | Instructions | Stitches |
|---|---|---|
| 10 | sc around | 30 |
| 11 | sc around | 30 |
| 12 | sc around | 30 |
| 13 | sc around | 30 |
| 14 | sc around | 30 |
These straight rounds are what distinguish a loaf cat from a spherical cat plush. Do not shorten them unless you intentionally want a rounder result. If you are adding stripes, change colors for one or two rounds here, then return to the main color. Make the color change on the final pull-through of the previous stitch.
Step 5: Shape the Back
| Round | Instructions | Stitches |
|---|---|---|
| 15 | [3 sc, dec] x 6 | 24 |
| 16 | [2 sc, dec] x 6 | 18 |
| 17 | [sc, dec] x 6 | 12 |
Begin stuffing after Round 15. Fill the face first, using small pieces of fiberfill around the eyes. Continue through the center of the body, but leave the last two rounds softer. The finished cat should feel springy rather than rigid.
Step 6: Crochet the Tail Directly From the Back
Before closing the final opening, make the tail from one edge stitch. Ch 8. Starting in the second chain from the hook, work 1 sc in each of the next 7 chains. Sl st into the same body stitch where the chain began. This creates a short flexible tail attached directly to the body.
If you want a curled tail, work 2 sc into every second chain as you return toward the body. The extra stitches make the strip curve naturally. For a straight tail, use one sc per chain.
Step 7: Close the Body
Add the final small amount of stuffing. Round 18: dec x 6. (6 sts) Cut the yarn, leaving a tail long enough to close the opening. Thread it through the front loops of the six remaining stitches and pull tight like a drawstring. Hide the yarn end inside the body.
The body should now look like a low oval with two front paws and a tail. If the back rises much higher than the front, massage the stuffing toward the middle and flatten the underside gently with your palms.
Step 8: Add the Ears With Surface Crochet
Mark two positions on top of the head, roughly above the outer edges of the eyes. Insert the hook through a body stitch and pull up a loop of the main color.
For each ear, ch 2, then work 2 hdc and 1 dc into the next surface space, ch 2, and sl st into the following body stitch. Fasten off and pull both yarn ends into the body. Repeat on the opposite side.
The ears should form small triangular bumps rather than large floppy pieces. If they look too tall, replace the double crochet with another half double crochet. Optional pink yarn can be surface-stitched inside each ear after the shape is complete.
Step 9: Embroider the Cat Face
Use pink yarn to make a tiny horizontal or triangular nose centered between and slightly below the eyes. With black thread, add a short line downward from the nose and two small curves for the mouth. Add two or three whisker stitches on each cheek.
Keep embroidery tension loose enough that the face stays rounded. Pulling the whiskers tightly can create dents. If you want blush, add one or two short pink stitches outside each eye.
How the Finished Cat Should Look
The finished cat should have a rounded face, long low body, two visible front paws, two small ears, and a tail that projects from the back. With worsted yarn and a 3.5 mm hook, expect approximately 10 to 12 cm from nose to back, plus the tail. Exact size varies with yarn thickness, tension, and stuffing.
The underside should sit relatively flat. If the cat rolls to one side, the stuffing may be uneven or one paw may be larger. Gently redistribute the fiberfill before deciding the shape is wrong.
Yarn and Hook Size Guide
| Version | Yarn | Suggested hook | Result |
|---|---|---|---|
| Mini | Sport or DK | 2.5 to 3 mm | Small charm-size loaf cat |
| Standard | Worsted | 3.5 mm | Palm-size cat |
| Plush | Chenille or super bulky | 5 to 6 mm | Large soft loaf cat |
These hook sizes are starting points. Choose a hook that creates dense fabric without making the stitches painfully tight. If stuffing is visible, first try slightly less stuffing or a smaller hook.
Easy Color Variations
Orange tabby
Use orange as the main color and add two or three darker orange stripe rounds through the middle body. Embroider a small darker stripe above the eyes for extra character.
Gray cat
Use medium gray with a white muzzle or chest detail. A pale pink nose gives enough contrast without requiring many color changes.
Tuxedo cat
Use black for the main body and embroider a white chest patch on the lower front after the body is finished. White paws can be suggested with a few surface stitches rather than separate pieces.
Calico-inspired cat
Use cream as the main color and add small orange and brown surface patches. Keep the patches irregular. Because they are embroidered after the body is complete, you can adjust their placement visually.
Common Problems and How to Fix Them
The cat looks like a ball instead of a loaf
Make sure you completed all five straight 30-stitch body rounds. Overstuffing can also shorten the visual length. Remove some fiberfill from the center and spread it toward the front and back.
One paw is larger
Both bobbles must use the same number of partial double crochets. Count five partial double crochets for each bobble and pull through all loops only at the end.
The ears are uneven
Mark both ear positions before attaching yarn. Count from the center top of the head toward each side. If one ear is already finished, use its starting stitch as the reference for the second.
The tail twists in the wrong direction
Rotate the chain extension before tightening the anchor slip stitch. If you want a stronger curl, add the extra single crochets gradually rather than forcing the finished strip into shape.
Stuffing shows through
Use a slightly smaller hook or reduce the amount of stuffing. A firm amigurumi fabric is useful, but the project does not need to feel hard.
Beginner Checklist Before You Finish
- The body has 30 stitches through the straight middle rounds.
- The eyes are level.
- The paws sit on the lower front and are similar in size.
- The body is longer than it is tall.
- The back is lightly stuffed.
- The tail is securely anchored.
- The ears are evenly spaced.
- The final opening is completely closed.
- All loose ends are hidden inside the cat.
No Sew Cat vs Traditional Amigurumi Cat
| Feature | This no sew loaf cat | Traditional cat |
|---|---|---|
| Body | One continuous piece | May use separate head and body |
| Paws | Integrated bobbles | Often separate legs |
| Ears | Surface crochet | Usually separate pieces |
| Tail | Built from body edge | Usually sewn on |
| Assembly | No part placement sewing | Multiple seams |
| Best for | Quick beginner projects | More sculpted realistic cats |
A traditional multi-piece cat can create longer legs, a shaped muzzle, and more realistic proportions. This pattern intentionally favors speed and low assembly. The loaf silhouette works because cats naturally curl and tuck their paws underneath themselves, making a simplified shape visually recognizable.
Safety Notes
For babies and very young children, use embroidered eyes instead of plastic safety eyes. Secure every yarn end inside the body. If you turn the cat into a keychain or bag charm, attach hardware through several reinforced body stitches, not through an ear, paw, or tail.
What to Make Next
For another compact no-sew animal, try the No Sew Frog Crochet Pattern. If you want to practice integrated shaping on a longer body, the No Sew Dinosaur Crochet Pattern adds a continuous tail and back spikes. You can find the complete growing series on our No Sew Amigurumi Patterns page.