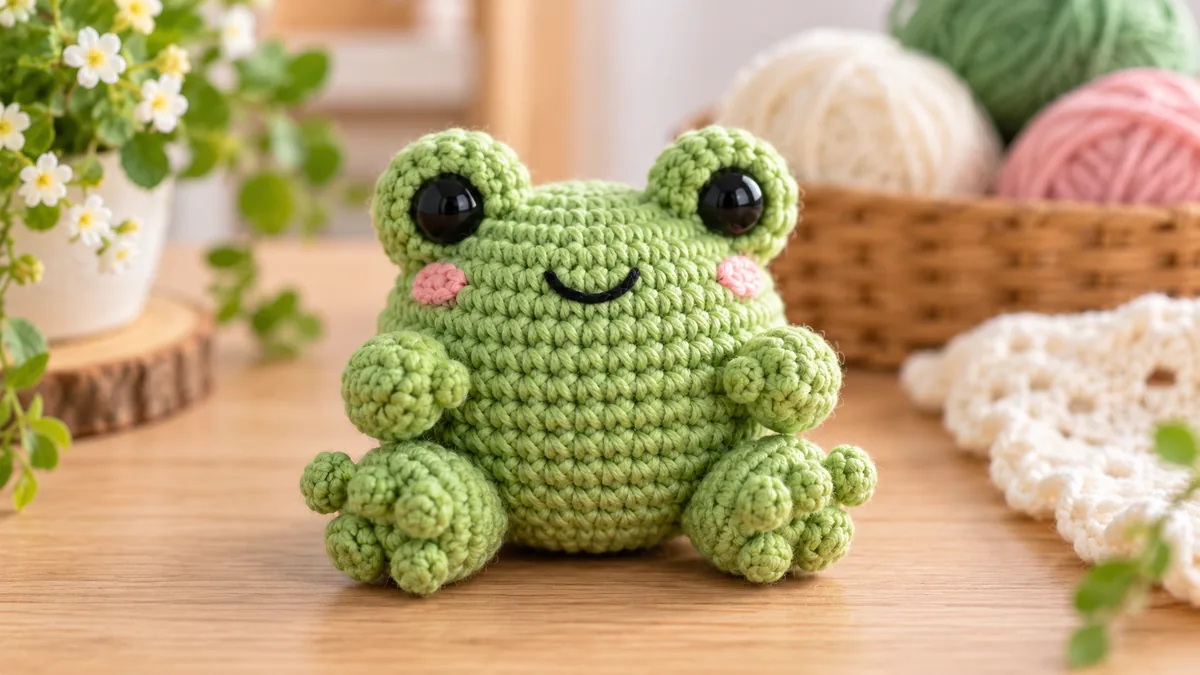
This no sew frog crochet pattern makes a small chubby amigurumi frog in one continuous body with the limbs formed as you crochet, so there are no separate arms or legs to sew on later. It is written in US crochet terms and designed for advanced beginners who already know a magic ring, single crochet, increase, decrease, chain, slip stitch, and bobble stitch.
The finished frog is a compact palm-size project when made with worsted weight yarn and a 3.5 mm hook. If you prefer plush yarn, you can keep the same stitch counts and use a larger hook to create a softer, bigger version. For more projects built around the same construction style, see our No Sew Amigurumi Patterns collection.
No Sew Frog Crochet Pattern: Quick Reference
| Pattern detail | Information |
|---|---|
| Skill level | Advanced beginner |
| Terminology | US crochet terms |
| Construction | One continuous body with built-in limbs |
| Sewing | No assembly sewing; yarn ends still need weaving in |
| Yarn | Worsted weight cotton or acrylic |
| Hook | 3.5 mm |
| Finished size | Approximately 7 to 9 cm tall depending on yarn and tension |
| Worked | Continuous rounds |
Materials
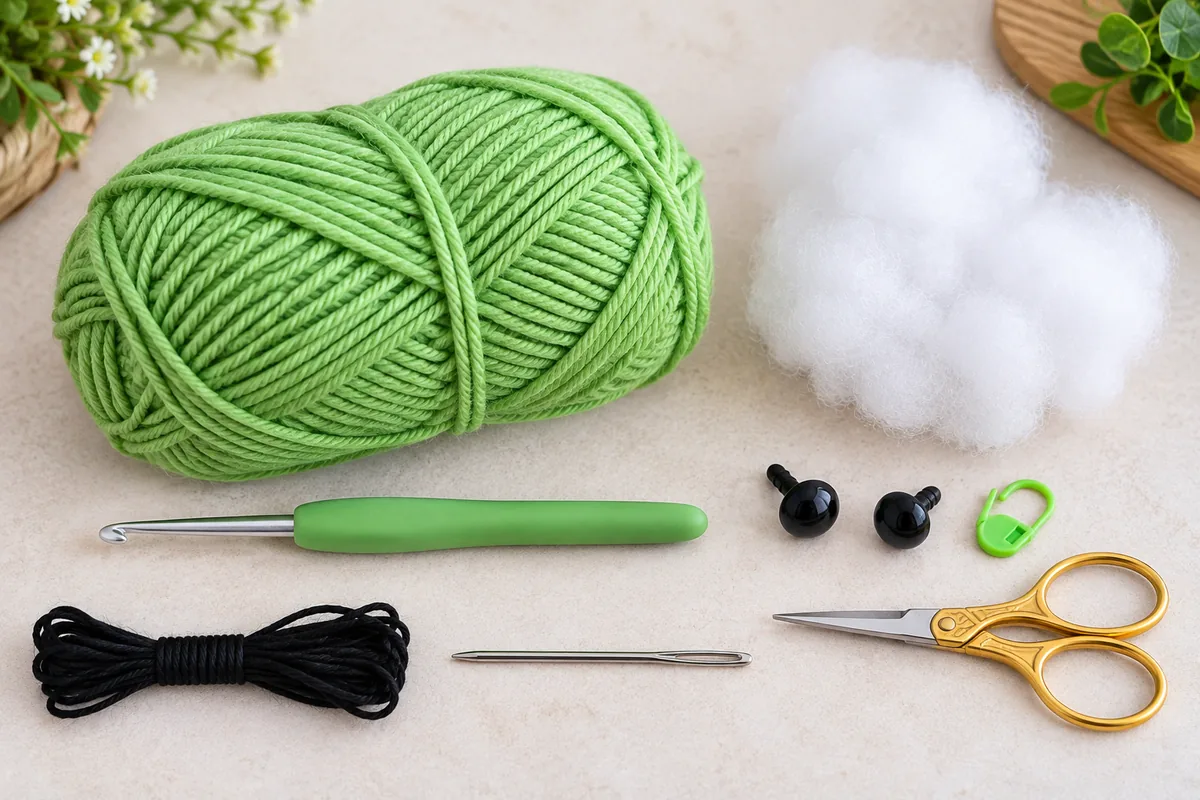
- Worsted weight yarn in green, approximately 25 to 35 m
- Small amount of black yarn or embroidery thread for the mouth
- Optional small amount of pink yarn for cheek details
- 3.5 mm crochet hook
- Polyester fiberfill
- Two 8 to 10 mm safety eyes, or black yarn for embroidered eyes
- Stitch marker
- Yarn needle
- Scissors
A smooth cotton or acrylic yarn is easiest for learning because the stitches stay visible. Chenille produces a softer plush frog, but beginners may find it harder to identify stitches and decreases. If the stuffing shows through your fabric, use a slightly smaller hook rather than pulling every stitch excessively tight.
Crochet Abbreviations
| Abbreviation | Meaning |
|---|---|
| MR | Magic ring |
| ch | Chain |
| sc | Single crochet |
| inc | Increase: 2 sc in the same stitch |
| dec | Invisible decrease |
| sl st | Slip stitch |
| bo | 4-dc bobble worked into one stitch |
| st / sts | Stitch / stitches |
How to Make the Bobble Stitch
The bobble stitch creates the small raised bumps used for the frog’s arms and legs. Yarn over, insert your hook into the next stitch, yarn over and pull up a loop, yarn over and pull through two loops. Repeat that partial double crochet sequence four times in the same stitch. You should have five loops on the hook. Yarn over and pull through all five loops. The bobble will naturally push toward the outside of the frog.
If your bobble disappears toward the inside, use your fingertip to push it outward before working the next stitch. Keep the following single crochet firm enough to hold the bobble in place without distorting the round.
Pattern Notes Before You Start
- Work in continuous rounds unless stated otherwise.
- Do not join rounds with a slip stitch.
- Move your stitch marker to the first stitch of every new round.
- The number in parentheses is the stitch count after the round.
- A bobble uses one body stitch and still counts as one stitch in the round.
- Stuff gradually. Do not wait until the final six stitches.
- Choose the front of the frog before placing the eyes and limbs.
Step 1: Crochet the Top of the Frog
Begin at the crown and work downward. The first four rounds create the rounded top of the head and establish the widest stitch count.
| Round | Instructions | Stitches |
|---|---|---|
| 1 | 6 sc in MR | 6 |
| 2 | inc in each st around | 12 |
| 3 | [sc, inc] x 6 | 18 |
| 4 | [2 sc, inc] x 6 | 24 |
| 5 | sc around | 24 |
| 6 | sc around | 24 |
| 7 | sc around | 24 |
After Round 7, the piece should look like a shallow cup with a smooth rounded top. If it looks wavy, check that each increase round has exactly the stated number of stitches. A missing increase can pull one side inward, while an extra increase can create a flare.
Step 2: Place the Eyes and Mark the Front
Choose the front of the frog. Place the safety eyes between Rounds 5 and 6, approximately 6 to 7 stitches apart. Do not lock the washers immediately. Look at the piece from the front and from above first. Small changes in eye spacing can make the frog look sleepy, surprised, or uneven.
If the frog is intended for a baby or very young child, use embroidered eyes instead of detachable plastic eyes. Safety eyes are not automatically safe simply because the washer feels tight. For very small children, embroidered facial details remove a detachable hard component.
Step 3: Crochet the Arms Into the Body
The arms are made as bobble stitches so they become part of the same round instead of separate pieces. Keep the front of the frog facing you when checking their position.
| Round | Instructions | Stitches |
|---|---|---|
| 8 | 4 sc, bo, 10 sc, bo, 8 sc | 24 |
| 9 | sc around | 24 |
The two bobbles should sit on opposite lower sides of the front half of the frog. If they look too far back, do not add or remove stitches from the round. Instead, unravel Round 8 and shift the starting point by one or two stitches before repeating the round. That preserves the total stitch count while improving the visual placement.
Step 4: Crochet the Legs Into the Body
The legs use the same bobble technique but sit lower and slightly wider than the arms. This gives the frog a squat seated shape without attaching separate feet.
| Round | Instructions | Stitches |
|---|---|---|
| 10 | 2 sc, bo, 14 sc, bo, 6 sc | 24 |
| 11 | sc around | 24 |
Before decreasing, check the frog from the front. The arms should sit slightly higher and the legs slightly lower. If one bobble is facing inward, push it outward with your fingertip. The final decreases will make the lower body rounder and help the frog sit on the limb bumps.
Step 5: Decrease, Stuff, and Close
| Round | Instructions | Stitches |
|---|---|---|
| 12 | [2 sc, dec] x 6 | 18 |
| 13 | [sc, dec] x 6 | 12 |
| 14 | dec x 6 | 6 |
Begin stuffing after Round 12. Add small pieces of fiberfill rather than one large clump. Fill the top of the head first, then the sides around the eyes, then the lower body. The frog should feel firm enough to hold its shape but not so hard that the stitches stretch open.
After Round 14, cut the yarn leaving a tail of about 15 cm. Thread the tail through the front loops of the final six stitches. Pull gently until the opening closes. Pass the needle through the center of the body and bring it out several centimeters away, then trim the yarn after the tension settles.
Step 6: Embroider the Mouth
Use black embroidery thread or a thin strand of black yarn. Make a small curved smile one round below the eyes. For a simple expression, use two short stitches that meet in the middle. Keep the mouth small because a wide mouth can visually pull the face downward.
Optional cheeks can be embroidered with one or two short pink stitches on each side. Keep these details flat rather than knotting bulky yarn on the surface.
How the Finished Frog Should Look
The finished frog should have a rounded head and body in one continuous shape, two raised arm bobbles, two lower leg bobbles, and a simple face centered above the front limbs. With worsted weight yarn and a 3.5 mm hook, the expected result is approximately 7 to 9 cm tall, depending on your tension and the exact yarn. A tighter crocheter may produce a smaller frog, while a looser crocheter may produce a slightly larger one.
The project is intentionally compact. It is designed to be a small desk plush, gift topper, market-style mini amigurumi, or bag charm base rather than a large stuffed toy.
Yarn and Hook Size Guide
| Version | Yarn | Suggested hook | Expected result |
|---|---|---|---|
| Mini | Sport or DK | 2.5 to 3 mm | Small charm-size frog |
| Standard | Worsted | 3.5 mm | Palm-size amigurumi |
| Plush | Chenille or super bulky | 5 to 6 mm | Larger soft plush frog |
These hook sizes are starting points, not universal rules. Yarn construction varies by brand. The correct hook is the one that creates a dense fabric without visible stuffing while still allowing you to insert the hook comfortably.
Common Problems and How to Fix Them
The frog looks lopsided
Check the stitch count at the end of every round. A single accidental increase can shift the center of the piece. Also confirm that you are placing the stitch marker in the first stitch of the new round rather than the last stitch of the previous round.
One arm or leg faces backward
Bobble stitches may twist inward while you continue crocheting. Push the bobble outward before the next round. If the placement is genuinely too far back, unravel only that limb round and shift the starting point while preserving all 24 stitches.
Stuffing shows between the stitches
Use a smaller hook or reduce the amount of stuffing. Do not solve the problem by yanking the working yarn excessively tight because that can make the next round difficult to crochet and can distort the fabric.
The eyes look uneven
Count the stitches between the eye posts before locking the washers. Also compare their height by following the horizontal row of stitches. If the eyes are already locked, avoid forcing them into a new position because that can stretch the crochet fabric.
The bottom will not close neatly
Stop decreasing after six stitches. Thread the yarn tail through the front loops and close the opening like a drawstring. Trying to crochet several extra decreases into a tiny opening usually creates a bulky knot.
Beginner Checklist Before You Fasten Off
- Both eyes are level and evenly spaced.
- The mouth is centered between the eyes.
- Both arm bobbles face outward.
- Both leg bobbles sit lower than the arms.
- The stuffing fills the head evenly without visible gaps.
- The final opening is fully closed.
- All yarn ends are secured inside the body.
Easy Variations
Tree frog colors
Use bright green yarn with yellow or orange cheek embroidery. Keep the stitch counts the same so the color change does not alter the structure.
Pastel frog
Mint, lavender, pale pink, and soft blue create a kawaii look that works well for small gift collections. Choose one body color and keep the face simple.
Sleepy frog
Replace plastic safety eyes with embroidered curved eyelids. This also removes the hard eye components from the design.
Keychain version
Use thinner yarn and a smaller hook. Attach a keyring only through a reinforced section of the top crochet fabric. Remember that a decorative keychain will experience more pulling and abrasion than a shelf plush.
No Sew Frog vs Traditional Amigurumi Frog
| Feature | This no sew frog | Traditional frog |
|---|---|---|
| Body pieces | One main piece | Often head and body separated |
| Arms and legs | Built-in bobbles | Often crocheted separately |
| Assembly | No limb sewing | Usually requires pinning and sewing |
| Best for | Quick beginner practice | More detailed shaping |
| Customization | Color, face, yarn size | More complex limb shapes and poses |
A traditional multi-piece frog can create longer legs, shaped feet, and more realistic proportions. A no-sew frog trades some of that detail for speed, fewer finishing steps, and easier repetition. Neither construction method is automatically better; the right choice depends on whether you value realism, speed, or minimal assembly.
What to Make Next
If you enjoy this construction style, the next logical project is our No Sew Octopus Crochet Pattern, which uses a different no-sew technique by working the tentacles directly from the body loops. Comparing the two patterns is a useful way to learn how no-sew amigurumi can use either bobble shaping or built-in extensions.